Introduction
Imagine the aroma of freshly baked bread wafting through your kitchen, but without the hours of waiting for dough to rise. Sounds like a dream, right? Well, prepare to have your culinary world rocked by this incredible 10-minute flatbread recipe! This isn’t just a quick fix; it’s a game-changer for anyone who craves the comforting warmth of homemade bread but finds themselves constantly short on time. Forget complicated yeast proofs and endless kneading sessions. This recipe delivers soft, pliable, and utterly delicious flatbreads in the blink of an eye, making it the ultimate superhero for busy weeknights, impromptu gatherings, or simply satisfying that sudden craving for something warm and wonderful.
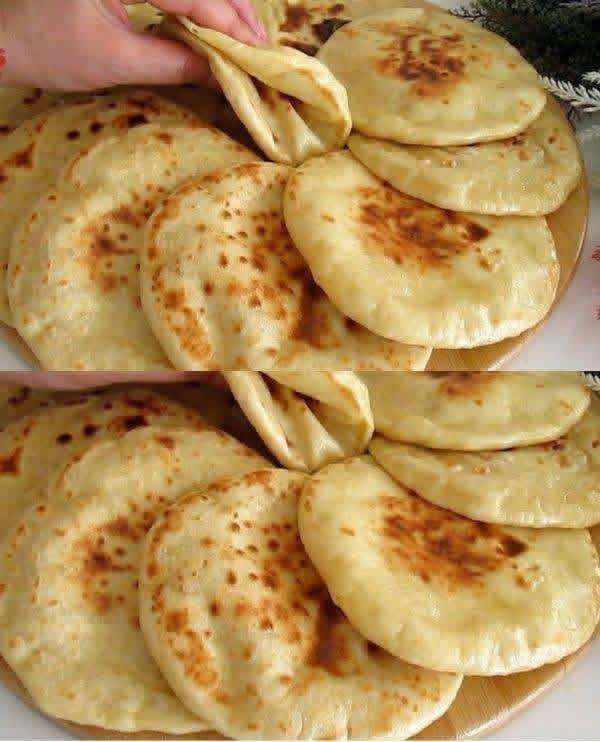
So, what exactly is 10-minute flatbread? It’s a marvel of simplicity and efficiency! This quick bread relies on minimal, everyday pantry staples and a no-fuss cooking method that gets you from flour to fantastic in the time it takes to brew a cup of coffee. Its magic lies in its incredible versatility. These golden, slightly puffed discs are perfect for scooping up hummus, cradling flavorful curries, transforming into lightning-fast mini pizzas, or even serving as a delightful side to any meal. Whether you’re a seasoned baker or a complete kitchen novice, this easy flatbread recipe is designed for success, promising warm, fresh bread without the commitment.
For the busy cook, this 10-minute flatbread is nothing short of revolutionary. It eliminates the intimidation factor often associated with bread making, proving that homemade doesn’t have to mean time-consuming. This recipe empowers you to create something truly special with minimal effort, bringing that comforting, rustic touch to your table any day of the week. Get ready to impress yourself and your loved ones with these pan-fried wonders – your new go-to bread recipe is just minutes away!
Nutritional Information
Per serving (approximate values):
- Calories: 180
- Protein: 5g
- Carbohydrates: 35g
- Fat: 2g
- Fiber: 1g
- Sodium: 250mg
Ingredients
- 2 cups (240g) all-purpose flour, plus more for dusting
- 1 teaspoon baking powder
- 1/2 teaspoon salt
- 1 tablespoon olive oil (plus more for cooking)
- 3/4 cup (180ml) warm water (or milk/yogurt for richer flavor)
Instructions
- In a large mixing bowl, whisk together the all-purpose flour, baking powder, and salt until well combined. This ensures the leavening agent is evenly distributed for a consistent rise.
- Add the 1 tablespoon of olive oil to the dry ingredients. Gradually pour in the warm water, mixing with a wooden spoon or your hands until a shaggy dough forms.
- Turn the dough out onto a lightly floured surface. Knead gently for about 2-3 minutes until the dough comes together into a relatively smooth ball. Avoid overworking the dough, as this can make the flatbread tough.
- Divide the dough into 6-8 equal pieces, depending on your desired flatbread size. Roll each piece into a small ball.
- Lightly flour your work surface and a rolling pin. Take one dough ball and roll it out into a thin circle, about 6-8 inches in diameter and roughly 1/8 inch thick. Aim for consistent thickness for even cooking. Repeat with the remaining dough balls.
- Heat a large cast-iron skillet or non-stick pan over medium-high heat. Do not add any oil to the pan initially. Allow the pan to get very hot, almost smoking, before adding the first flatbread.
- Carefully place one flatbread into the hot, dry skillet. Cook for 1-2 minutes per side, or until golden brown spots appear and the flatbread begins to puff up. You’ll see bubbles forming on the surface – this is a good sign!
- Flip the flatbread with tongs and cook for another 1-2 minutes on the second side until it’s also golden brown and cooked through.
- Transfer the cooked flatbread to a plate and cover it with a clean kitchen towel to keep it warm and soft while you cook the remaining flatbreads. If desired, you can brush the cooked flatbreads with a little olive oil or melted butter for extra flavor and softness.
- Repeat the cooking process with the remaining dough, adjusting the heat as needed to prevent burning. Serve immediately and enjoy your fresh, homemade 10-minute flatbreads!
Cooking Tips and Variations
To ensure your 10-minute flatbreads are always a success, remember that a hot skillet is your best friend. Preheat it thoroughly over medium-high heat until it’s almost smoking before adding the first flatbread. This high heat is crucial for achieving those beautiful golden spots and encouraging the flatbread to puff up, creating a soft, airy texture. Don’t overcrowd the pan; cook one or two at a time, depending on your pan size, to maintain consistent heat and ensure even cooking. After cooking, stack the warm flatbreads and cover them with a clean kitchen towel. This traps the steam, keeping them soft and pliable until you’re ready to serve.
When it comes to the dough, resist the urge to overwork it. For a quick, no-yeast flatbread, minimal kneading is key to a tender result. Just combine the ingredients until they form a cohesive dough and knead for a brief couple of minutes to develop a smooth texture. Experiment with the thickness of your flatbreads; thinner ones will be crispier, while slightly thicker ones will offer a chewier bite. If your flatbreads aren’t puffing, it could be due to a pan that isn’t hot enough or dough that’s rolled too thick.
The versatility of these flatbreads is truly endless. For a savory twist, incorporate dried herbs like oregano, thyme, or rosemary directly into the dough. Garlic powder or a pinch of chili flakes can also add a delightful kick. After cooking, brush the warm flatbreads with garlic butter or a simple olive oil and herb mixture for an extra burst of flavor. These flatbreads are perfect as a quick base for mini pizzas; simply spread with sauce, sprinkle with cheese and your favorite toppings, then briefly broil or bake until the cheese is melted and bubbly. They also make fantastic wraps for lunch, breakfast sandwiches, or even a sweet treat when brushed with butter and sprinkled with cinnamon sugar.
Storage and Reheating
These 10-minute flatbreads are best enjoyed fresh off the skillet, but any leftovers can be stored for later enjoyment. To store, allow the flatbreads to cool completely. Stack them and place them in an airtight container or a resealable plastic bag. They will keep well at room temperature for up to 2 days, or in the refrigerator for up to 4-5 days. For longer storage, you can freeze the cooked flatbreads. Wrap them individually in plastic wrap, then place them in a freezer-safe bag or container. They will stay fresh in the freezer for up to 2-3 months.
Reheating these flatbreads is simple and quick, allowing you to enjoy their fresh taste anytime. From the refrigerator, you can reheat them in a dry skillet over medium heat for about 30-60 seconds per side, until warmed through and slightly crisp. Alternatively, a microwave can be used for a few seconds (10-15 seconds per flatbread) for a softer result, though this method may not achieve the same crispness. If reheating from frozen, you can place the frozen flatbreads directly into a hot, dry skillet over medium heat, cooking for 1-2 minutes per side, or until completely thawed and heated through. You can also warm them in a preheated oven at 350°F (175°C) for 3-5 minutes. Covering them with foil in the oven can help prevent them from drying out.
Frequently Asked Questions
What makes this flatbread “10-minute”?
This flatbread is called “10-minute” because it’s a quick, no-yeast recipe that eliminates the lengthy rising time typically associated with bread making. From mixing the dough to cooking on the skillet, the entire process can realistically be completed in about 10-15 minutes, making it incredibly fast and convenient for a fresh bread option.
Can I use whole wheat flour for this recipe?
Yes, you can substitute some or all of the all-purpose flour with whole wheat flour. However, whole wheat flour absorbs more liquid, so you might need to add an extra tablespoon or two of water to achieve the right dough consistency. The resulting flatbreads may also be a bit denser and have a slightly nuttier flavor.
Why aren’t my flatbreads puffing up?
Several factors can prevent flatbreads from puffing. The most common reasons are that your skillet isn’t hot enough, or the dough is rolled too thick. Ensure your pan is very hot before adding the flatbread, and roll the dough to an even, thin thickness (about 1/8 inch). Also, don’t overwork the dough, as this can develop too much gluten and make it less pliable and less likely to puff.
What can I serve with these flatbreads?
These versatile flatbreads are fantastic with a wide variety of dishes! They are perfect for scooping up creamy hummus, baba ghanoush, or your favorite dips. They pair wonderfully with hearty stews, curries, and chili. You can also use them as a base for quick mini pizzas, fill them with grilled meats and vegetables for wraps, or serve them alongside scrambled eggs for a simple breakfast. The possibilities are truly endless!